
Low temperatures in PC parts are something that almost everyone wants. But not everyone has them, and not everyone knows how to have a properly cooled PC.
In this article, I am going to guide you through using case fans and selecting a good case to improve the cooling of your computer.
Cooling Fans
Fan Specifications
When you want to know about the cooling performance of a fan, your first step should be to look how much CFM of air it moves. CFM stands for Cubic Feet per Minute; this tells you the volume of air that the fan can move from one side of itself to the other within a minute. While there are many relevant factors, in general a higher CFM will translate into better cooling performance. As such, you want to look for fans with a high CFM.
 Most fans are 4-pin PWM fans at this point, but you should also check what kind of connection the fan will use, and whether that type of connection is natively supported by your motherboard. Some older or cheaper fans use 3-pin connections, or even hook up directly to a power supply cable and run at full speed all the time.
Another metric you should look at is the physical size of the fan: Does it fit within your case, and in the spot you want to put it?
But to know what size it should be, you’ll first need to decide which fan mounting positions in your case should be filled. I advise having at least one intake and one exhaust fan. This way, new room-temperature air is sucked into the case, and heated air is pulled away.
Fan Positioning
So, with one intake and one exhaust, having two fans is self-explanatory. In situations with three or more fans, through, just try to aim for having more air pulled in through intake fans than pushed out through exhaust fans (in terms of total CFM), to create positive pressure inside the case. Positive pressure helps to prevent dust from being pulled into the case through the many random openings and gratings around the case, in addition to helping prevent pockets of hot air from accumulating anywhere inside the case.
After deciding how many intake and exhaust fans to use, you’ll still need to decide where exactly to put them. Hot air rises above cold air, so your exhaust fans should be positioned above your hottest components, usually near the top back corner of the case.
Your intake fans, conversely, are (favorably) positioned low. This intake strategy helps the fans on your graphics card (and sometimes power supply) to receive a steady flow of new air for cooling. Technically, it may also lead to slightly cooler air being pulled in from outside the case (when compared to higher intake positions), but this is likely to be a very slight difference.
Finally, when positioning your fans, try to make sure your airflow is in one direction only. Prevent any fans from contradicting each other. For instance, you don’t want to have one case fan pull fresh air in, only for another fan positioned nearby to immediately pull the fresh air out of the case before it can reach any hot parts. Instead, you should make sure the fresh air is blown towards components such as the CPU or GPU, and that hot air is pulled away from those same places in the same overall direction.
Case Cooling Concerns
 When looking for a case that will ensure good cooling, there are several important things to look at.
First, check if you can mount at least one intake and one exhaust fan. This is a pretty low bar to clear, and the vast majority of standard ATX form factor cases will definitely have this. But it can be an important basic element to double-check when looking at small form factor cases, like micro ATX or even mini ITX.
After that, see if the places are optimal: are there spots for fans in the back at the top, and in the front near the bottom? Ideally, a case would actually have at least two intake positions near the middle and bottom of the front panel.
即使有了这些额外的担忧要记住,莫st cases will meet these requirements. But not all of them will also have dust filters on those fan mounts; although not a necessity, filters (whether rigid metal/plastic or flexible cloth mesh) are a nice feature that can cut down on future maintenance. Otherwise, over time, dust can clog up your fans and case, restricting airflow and reducing cooling capabilities. Dust filters prevent some of that dust from coming in, and thus helps your PC stay cool in the long run.
If filters do not come with the case you were planning to buy, do not worry; you can buy separate filters, and even cut them to the right size if they’re not perfect. Now, all of that said, it’s worth pointing out that no air-cooling method or case choice can completely prevent the build-up of some dust in the system, so prioritizing cleaning your case and fans at least annually remains a good idea.
Lastly, make sure the case has a fair amount of surface area for air intake on the front panel: cases that are (almost) completely closed on the front tend to result in hot-running systems, even if they have plenty of intake fan mounts right behind.
Case and Fan Example Combinations
To give some concrete examples of how to implement this, I have created 3 combinations for different budgets or requirements. Please keep in mind that, before purchasing a case, you should always check if your motherboard, GPU, and your CPU Cooler will fit!
出色的案例和风扇组合
This combination is for someone planning to do some heavy overclocking and running a power-hungry GPU (or even two!). This combination delivers excellent air cooling performance.
Case:Fractal Design Meshify C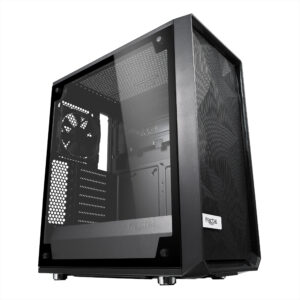

 这种情况下有一个网前,让球迷拉a lot of air in from the front. This makes this case perfect when looking for cooling performance. It also comes with two preinstalled 120 mm fans with decent airflow. In general, this case always gets loving reviews, and you cannot go wrong with it.
Extra Fan(s):Noctua NF-F12
To improve the cooling performance and take full advantage of the mesh front, I suggest buying three Noctua F12 fans. These fans transport a lot of air, and do so without too much noise. I would install those three in the front so that a lot of fresh air comes in every minute. Then you can install the two other fans that came with the case in the back and top, to help exhaust hot air. Don’t forget to make a plan for how you’ll control all those fans, too! Only a few premium motherboards have enough fan headers to support 5 case fans and a CPU Cooler without getting a separate fan controller.
Budget Case and Fan Combo
This combination is meant for someone building a lower-end computer: It features decent cooling for the price, but lacks some nice-to-have features here and there. Still, it forms a good basis for a good, cool build.
Case:Fractal Design Focus G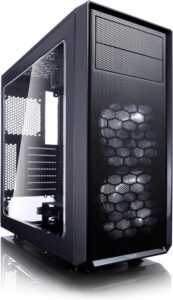

 One of the only cases at the sub 60 USD budget that comes with 2 fans, giving you good value for the money. The case has dust filters too!
Extra Fan(s):Noctua P12 Redux
I suggest buying one extra Noctua P12 redux, and fitting it in the back. This gives the combination an exhaust fan with decent CFM, to be able to keep up with all the air coming in from the double front fans. This plan should make for a fairly straightforward build process, too, since you can just leave both of the pre-installed fans right where they are.
Silent Fan and Case Combo
If you prefer your build to be both silentandwell-cooled, some extra things should be considered. Buying silent fans and a case that dampens noise are highly advisable in such a situation. If you have these wishes in mind, then this combination is for you.
Case:Antec P101 Silent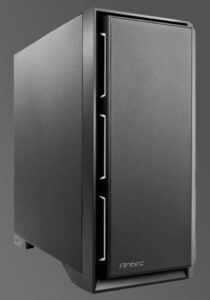

 With this case, I am making an exception to what I said earlier: “cases that are (almost) completely closed on the front tend to result in hot-running systems.” This case does not have a very open front with mesh, ad did the previous two cases. Instead, this case has gaps on the side to let air in. Although it would be more thermally efficient to opt for a case with a mesh front, this more closed-off case will result in lower noise levels (whilst still letting a reasonable amount of air in). As a cherry on top, this case has sound-dampening side panels; nice!
Extra Fan(s):Noctua NF-S12A
Although the case already comes with four pre-installed fans with solid CFM and not too much noise, if you want the build to produce even less noise, I suggest replacing them with NF-S12A ULN fans from Noctua. The NF-S12A is known to be one of the most silent 120mm fans for PCs: noise levels should be around 8 dB most of the time!
Closing Remarks About Cooling Your PC
I hope I helped you a little further with your efforts in composing a well-cooled build. In closing, here are some key takeaways:
Fans
- Use at least 2 case fans, with a good set-up being a low front intake and high rear exhaust
- Buy the correct fan size for your case, and correct connection type for your motherboard
- CFM = airflow volume; make sure you get fans with a high CFM (high would be above 30)
- Check noise levels… if you care about noise
Cases
- Make sure there is room for fans in both the back and front
- Mesh front panels (rigid or soft) are always nice to have
- Dust filters are nice too, but you can buy aftermarket filters later if they are not included
- Check noise dampening… if you care about noise